
Help CenterHelp CenterHelp CenterHelp Center
  • Inicio
  • Diccionario Agro
  • Ikos
    • App de Ikos
    • Ir a la web de Ikos
    • Ikos Academy
  • FAQs
  • Help Center ADM
  • Help Center Notes
    • Preguntas Frecuentes Notes
  • Recursos
    • Galería de Videos
Help Center
  • Inicio
  • Diccionario Agro
  • Ikos
    • App de Ikos
    • Ir a la web de Ikos
    • Ikos Academy
  • FAQs
  • Help Center ADM
  • Help Center Notes
    • Preguntas Frecuentes Notes
  • Recursos
    • Galería de Videos

Primeros pasos

12
  • Cómo crear una cuenta
  • Raindrop
  • Consultar las últimas mediciones
  • Ver la previsión meteorológica
  • Actuar como técnico o administrador de otro usuario
  • Gráfica de DPV
  • Cómo exportar últimas mediciones
  • Manual de Instalación Ikos Controller
  • Onboarding inicio
  • Cómo invitar a un técnico
  • Activación de Raindrop
  • Cómo añadir un cultivo

Cuenta y perfil

12
  • Cómo crear una cuenta
  • Cómo iniciar sesión
  • Cómo cerrar sesión
  • Cómo cambiar la contraseña
  • Editar los datos de mi perfil
  • Cómo cambiar la foto de perfil
  • Cómo renovar mi suscripción
  • Cómo eliminar mi cuenta de Ikos
  • Editar mis datos de facturación
  • Cómo ver los usuarios de mi licencia de Ikos
  • He olvidado mi contraseña
  • Cómo configurar un espacio

Actividades

5
  • Cómo añadir una recolección
  • Cómo añadir otros trabajos
  • Cómo eliminar una actividad
  • Cómo ver o editar una actividad
  • Cómo aplicar ácido giberélico en la alcachofa Green Queen

Configuraciones

7
  • Cómo cambiar la apariencia
  • Cómo cambiar el idioma
  • Cómo cambiar de zona horaria
  • Exportar listado de accesos
  • Cómo saber qué versión de la aplicación tengo instalada
  • Cómo ver el espacio usado por la aplicación
  • Cómo ver el espacio usado del almacén de archivos

Ikos IA

4
  •  ¿Qué es Ikos7Cast? 
  • Nematool: modelo predictivo de nematodos en Ikos
  • Raindrop Pro
  • Ikos AI

Gráficas

9
  • Raindrop
  • Gráfica de DPV
  • Gráfica de Radiación solar
  • Gráfica de Conductividad eléctrica y temperatura de suelo
  • Gráficas de Volumen de Riego
  • Gráfica de Clima
  • Gráfica Tensiómetros
  • Activación de Raindrop
  • Problemas con gráficas
    • Qué hacer si la CE del suelo cae bruscamente

Todo sobre Raindrop

6
  • Raindrop
  • Razones por las que Raindrop no se activa
  • Cómo corregir lecturas de tensiómetros cuando la tensión no baja en la gráfica
  • ¿Qué significa que el botón de Raindrop esté en rojo?
  • Activación de Raindrop
  • Raindrop Pro

Soporte

10
  • Cómo abrir un ticket
  • Cuándo me toca renovar la suscripción
  • Cómo solicitar ayuda
  • Cómo ver el detalle de un ticket
  • Cómo solicitar ayuda para acceder a la aplicación
  • Cómo funciona el Centro de Ayuda
  • Cómo solicitar ayuda a través de Whatsapp 
  • Cómo ver mis productos contratados
  • Cómo filtrar tickets
  • Cómo solicitar una formación con Ikos

Sensores

10
  • Sensor de radiación solar PAR
  • Contador volumétrico
  • Ikos Meteo
  • Tensiómetros
  • Sensor DPV
  • Hidropónico
  • Anemómetro
  • Cómo configurar el contador volumétrico
  • Ikos Multisensor
  • Modelos equipos ikos

Ikos Controller

12
  • Cómo vincular o añadir un equipo Controller a la app
  • Cómo editar la info de un Ikos Controller
  • Como dormir o activar un Ikos controller
  • IKOS ONE IOT Controller Bundles
  • Como eliminar un Ikos controller en la app
  • Cómo instalar el sistema hidropónico Ikos Controller Cosmos
  • How to install the Ikos Controller Cosmos hydroponic system
  • Comment installer le système hydroponique Ikos Controller Cosmos
  • Manuales Controller
    • Manual de Instalación Ikos Controller
    • Manual de Mantenimiento Ikos Controller
    • Manual de Retirada Ikos Controller
    • Manual de Reinstalación Ikos Controller

Ikos Connect

32
  • Cómo activar o desactivar el control auto del connect
  • Cómo habilitar o deshabilitar el Ikos Connect
  • Cómo ver el histórico de acciones del Ikos Connect
  • Ikos Connect
  • Alertas Connect y soluciones
  • Como eliminar o desvincular un Ikos connect
  • Aqua Sync - Control de Riego
    • Cómo crear un programa de riego
    • Cómo crear un programa con abonadora
    • Módulo de Riego del Connect AS
    • Módulo Abonadora del Connect AS
    • Como activar o desactivar el control auto del módulo de riego
    • Como encender o apagar el módulo de riego
    • Como ver el histórico de acciones del módulo de riego
    • Como eliminar un módulo de riego
    • Programas de Riego
    • Cómo ver las demandas del módulo de riego
    • Cómo crear un grupo de demandas de riego
  • Climate Sync - Control de Clima
    • Cómo crear un programa de ventilación
    • Cómo crear un programa de sombreo
    • Cómo crear un programa de nebulización
    • Módulo Ventanas del Connect CS
    • Módulo Nebulización del Connect CS
    • Módulo Pantallas del Connect AS
    • Programas de clima
    • Cómo editar el módulo de clima
    • Como activar o desactivar el control auto del módulo de clima
    • Como añadir un módulo de clima
    • Como encender o apagar el módulo de clima
    • Cómo ver el histórico de acciones del módulo de clima
    • Cómo eliminar un módulo de clima
    • Cómo crear un grupo de ventanas
    • Cómo crear un grupo de pantallas

Alarmas

4
  • Cómo crear una alarma
  • Cómo editar una alarma
  • Cómo eliminar una alarma
  • Cómo habilitar o deshabilitar una alarma

Programas

10
  • Cómo crear un programa de riego
  • Cómo crear un programa con abonadora
  • Cómo crear un programa de ventilación
  • Cómo crear un programa de sombreo
  • Cómo crear un programa de nebulización
  • Cómo activar o desactivar un programa
  • Programas de clima
  • Cómo editar un programa
  • Cómo eliminar un programa
  • Programas de Riego

Cultivos

6
  • Cómo finalizar un cultivo
  • Cómo eliminar un cultivo
  • Cómo filtrar cultivos
  • Cómo ver qué cultivo tiene asociado tu dispositivo
  • Cómo añadir un cultivo
  • Cómo editar un cultivo

Fincas

5
  • Cómo editar los datos de una finca
  • Cómo añadir una finca
  • Cómo eliminar una finca
  • Espacios y sectores en Ikos
  • Cómo cambiar la vista del mapa

Equipo de trabajo

4
  • Cómo ver los miembros de mi equipo
  • Cómo crear cuenta como técnico
  • Cómo aceptar una invitación a Ikos
  • Cómo invitar a un técnico

Diagnóstico de equipos

17
  • Cómo diagnosticar las conexiones del Ikos Controller
  • Montaje, partes y canales del Ikos Controller
  • Daños más comunes de los equipos
  • Comprobaciones en equipos antes de generar un ticket
  • Cuándo cambiar el líquido de los tensiómetros
  • Cómo reiniciar el equipo Ikos Controller
  • Cómo ajustar los niveles de conductividad eléctrica (CE)
  • Tercer tensiómetro: por qué muestra una lectura diferente
  • Ikos Controller: qué hacer si pierde la conexión
  • Ikos Controller: qué hacer si muestra batería baja
  • Cómo actuar ante fallos en tu tensiómetro
  • Ikos Connect no enciende o no carga correctamente
  • Pasos a seguir si tu Ikos Controller tiene problemas de cobertura
  • Mediciones del contador volumétrico erróneas
  • Montaje, partes y canales del Ikos Controller
  • Por qué los tensiómetros se vacían durante un estrés hídrico
  • El traductor del tensiómetro no está bien apretado

Notificaciones

3
  • Cómo visualizar las notificaciones
  • Cómo silenciar las notificaciones
  • Cómo configurar las notificaciones

Calendario

1
  • Cómo funciona el calendario

Alertas

2
  • Alertas Climáticas
  • Alertas Controller y soluciones

Conceptos agronómicos

4
  • Conceptos agronómicos
  • ¿Qué es la inversión térmica?
  • ¿Qué es la condensación?
  • Recomendaciones para disminuir las altas temperaturas en el cultivo

Predicciones 7Cast

2
  • Cómo ver las condiciones climáticas de los próximos 7 días de mi finca 
  •  ¿Qué es Ikos7Cast? 

Almacenes

3
  • Cómo editar un almacén
  • Cómo añadir un almacén
  • Listado de stock de productos

Fichas técnicas

4
  • Ficha técnica Ikos Controller Cosmos
  • Ficha técnica Ikos Controller Nexus
  • Ficha técnica Ikos Controller Atlas
  • Ficha técnica Ikos Controller Terra

Casos de Uso

6
  • Razones por las que Raindrop no se activa
  • Cómo corregir lecturas de tensiómetros cuando la tensión no baja en la gráfica
  • Optimización del riego en suelos con alta retención de humedad
  • Lecturas diferentes entre sectores: el suelo tiene la clave
  • Corrección de lecturas de humedad en suelos compactos
  • Lecturas elevadas de conductividad

Huella hídrica | IKOS Aqua

4
  • Gráficas de Volumen de Riego
  • Contador volumétrico
  • Ikos Meteo
  • IKOS Aqua: calcula y certifica la huella hídrica de tu cultivo
  • Inicio
  • Documentación
  • APP
  • Ikos Controller
View Categories

How to install the Ikos Controller Cosmos hydroponic system

This article is also available in: Español · Français

This guide describes the full installation and commissioning procedure for the Ikos Controller Cosmos in hydroponic crops, together with the technical specifications of the unit and each of its sensors. It is written for the installation technician and serves as a reference document for the customer.

1. Equipment description #

An advanced measurement system for hydroponic crops, designed to operate wirelessly and autonomously thanks to its rechargeable battery and solar panel.

It provides comprehensive crop monitoring through a set of high-precision sensors, ideal for optimising yield and plant health.

Beyond making it easier to control growing conditions, the system allows more efficient management of water and energy, contributing to more sustainable and profitable production.

System components #

  • Ikos Controller · datalogger and transmission
  • Ikos Tensiometer · substrate tension
  • Ikos Multisensor · moisture, EC and temperature
  • Ikos DPV (H&T) · temperature and humidity
  • Ikos PAR sensor · radiation
  • Drainage gauge · weight and tank
  • Volumetric meter · irrigation volume
  • Solenoid valve · line control

Key features #

  • Multiple communication modules (UNB or GPRS) for efficient connectivity.
  • Several sensors can be connected to each device, allowing complete monitoring.
  • Powered by a rechargeable battery and solar panel for continuous, sustainable operation.
  • Easy to install and portable, suitable for different crop types and configurations.

2. Datalogger connectivity schematic #

Before you start, familiarise yourself with the connections on the box. Each sensor has an assigned position on the datalogger, identified by its label: WEIGHT, VALVE, TEN·S, TEN·P, H&T, RAD, MULTI, CONT and 12 V. The antenna connects on the upper side.
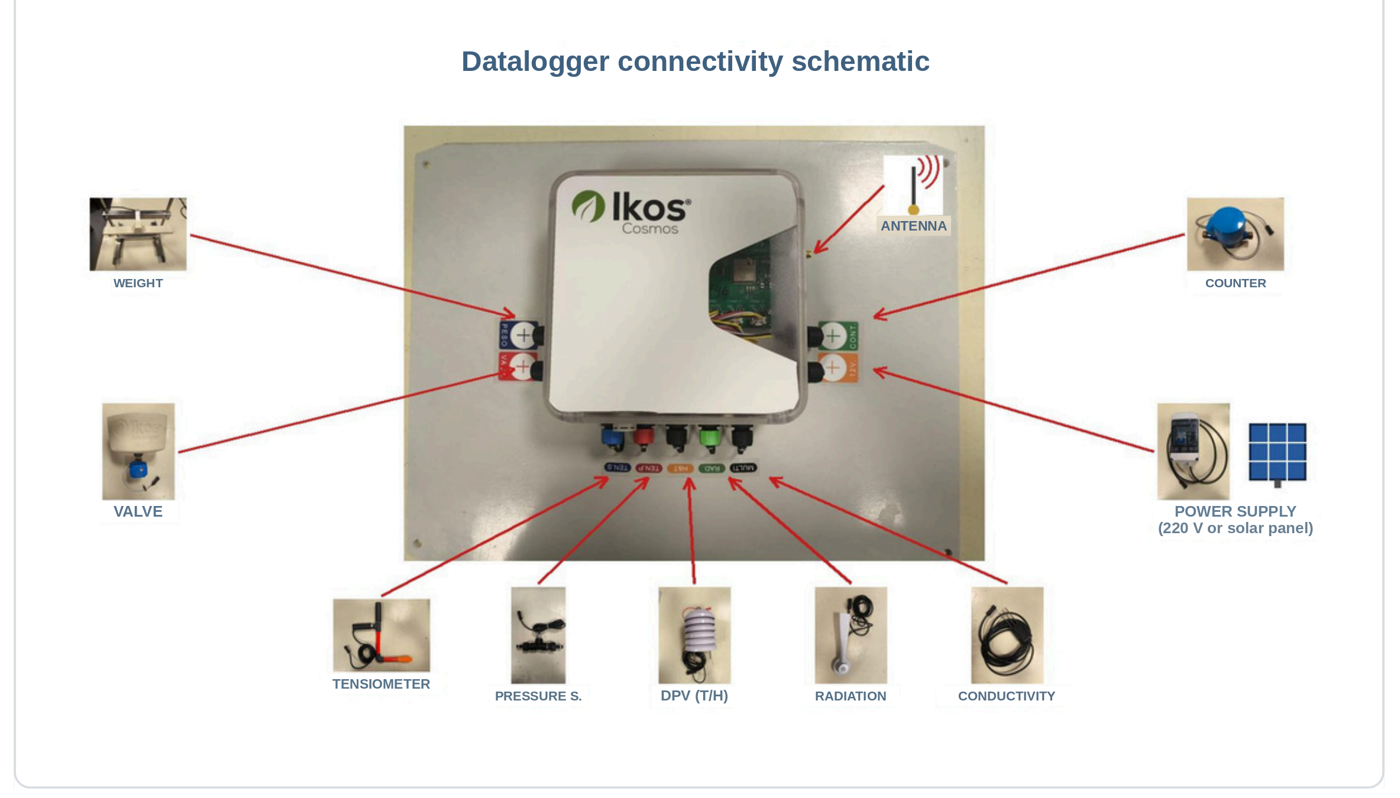
Datalogger connectivity schematic.

3. Before you start · key recommendations #

  • Tray location: do not install it under a water channel, and choose the most representative bags on the line.
  • No leaks: the drip line must be free of leaks, both in the pipe and in the drippers, as this would affect the drainage calculation.
  • Levelled tank: the tank must discharge as much water as possible when emptying; nothing should be in contact with the tank or the load cell.
  • Registration and calibration: weight calibration is always carried out with an Ikos technician, who sends the calibration codes (a 200 g reference weight is included).
  • Extension cables: volumetric meter → 25 m; radiation sensor, weight and valve → 2.5 m each.

4. Installation procedure #

Step 1 · Choosing the installation point #

Select the most suitable installation point. Do not install the tray under a water channel and choose the most representative bags. Find the mid-point of the line, place the tray next to the supports and join them with the screws.
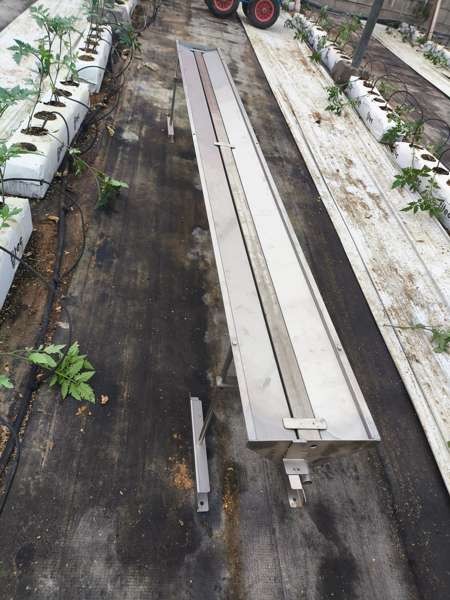
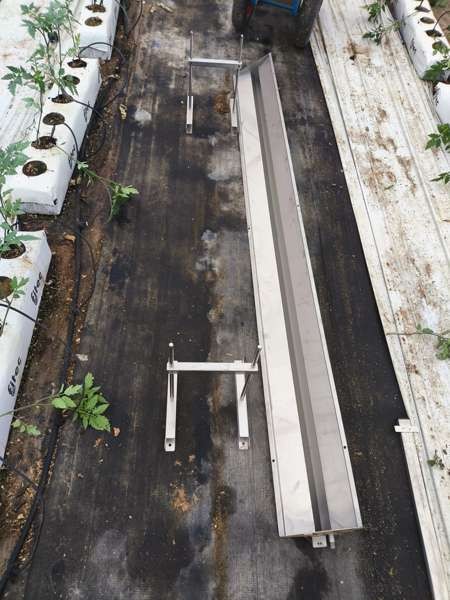
Tray and legs laid out in position
Tray fixed to the supports with screws

Step 2 · Positioning the tray #

Remove the 2 plant bags you are replacing with the tray and put it in their place, with the water outlet facing the slope of the site to help the water drain. Place the growing bar in the centre.
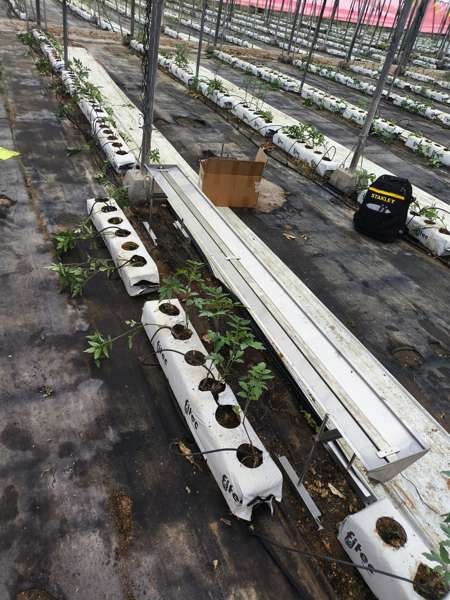
Tray placed where the bags were removed

Step 3 · Levelling the tray #

Using the screws that join the tray to the legs, adjust the tilt with a spirit level. Level across the width and apply the slope along the length, aiming for the fall towards the water outlet connection.
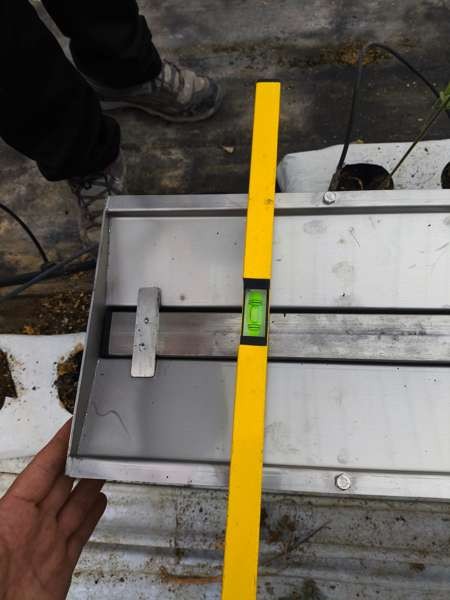
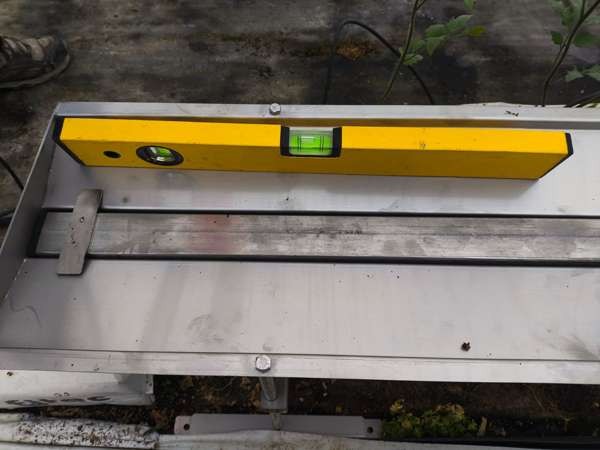
Levelling across the width of the tray
Checking the slope along the length

Step 4 · Installing the bags with their drippers #

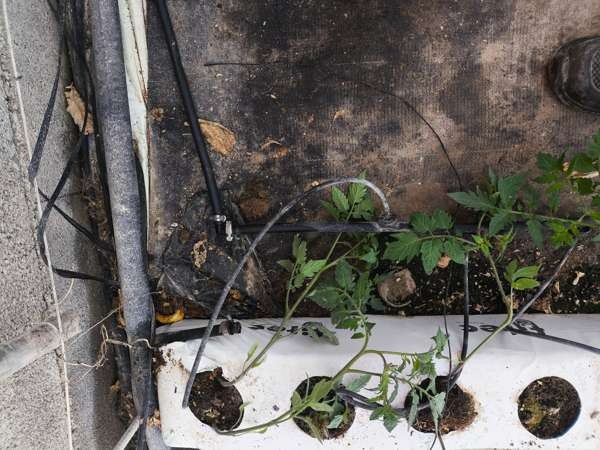
Install the plant bags with their drippers on the tray, once it is in place and levelled.
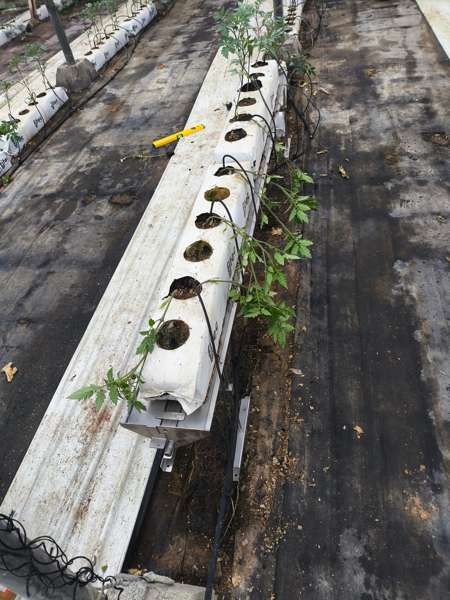
Bags with plants and drippers installed on the tray

Step 5 · Installing the weight bracket and tank #

Install the weight bracket with two screws and its spacers in the position shown, then fit the tank. Both the load cell and the tank have a connector that must be joined to a 2.5 m extension cable, which in turn connects to the matching connector on the box.
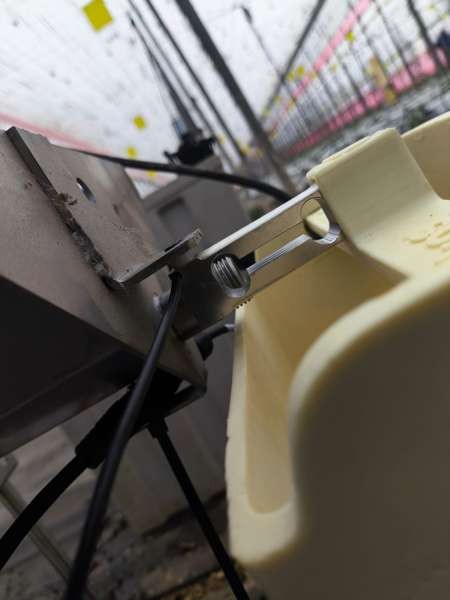
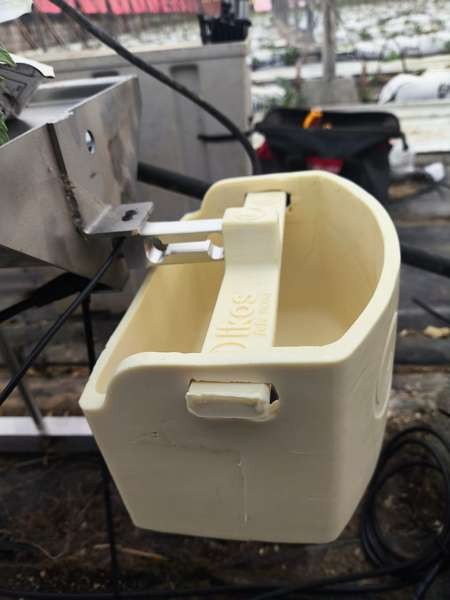
Load cell and tank assembly
Detail of the weight bracket with its spacers

Step 6 · Installing the sensors #

Tensiometer: place it in the centre plant, with the ceramic facing the plant. On large or more mature plants, install it from the side. In both cases the ceramic must sit in the centre of the bag at mid-height.
EC sensor: install it the same way, making sure the dripper falls vertically onto the sensor prongs.
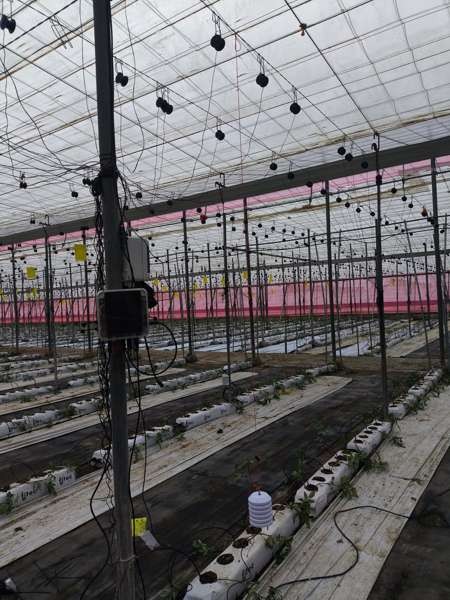
Radiation sensor: install it facing south, above the plants, so they never cover it during the cycle.
Temperature and humidity sensor (DPV): install it at canopy height.
Connect each sensor to its matching position on the datalogger.
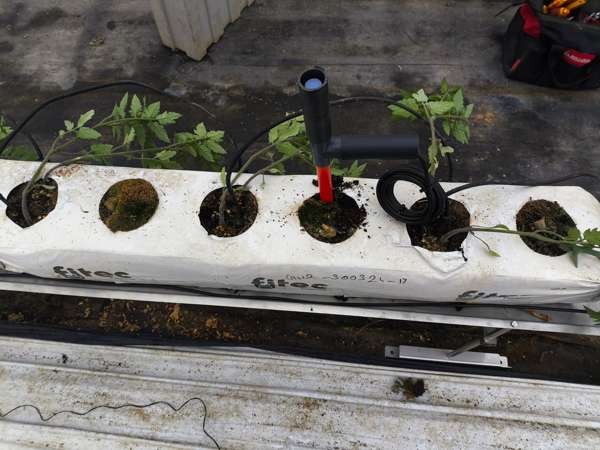
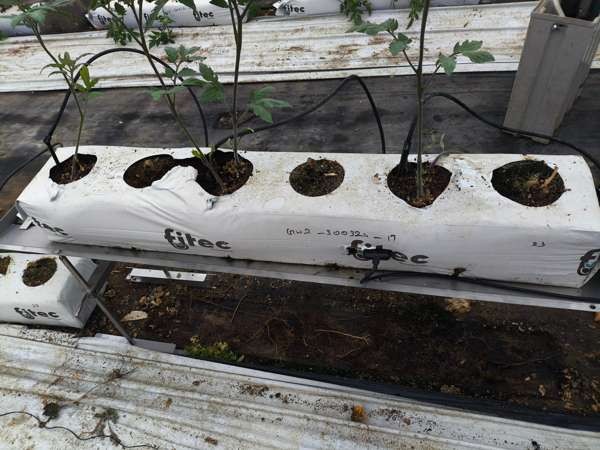
Tensiometer installed in the centre plant
EC sensor with its prongs in the bag
Radiation sensor installed above the crop
Temperature and humidity sensor hung at canopy height

Step 7 · Installing the meter #

Install the meter at the start of the dripper line. Mind its orientation: the arrow shows the direction of the water. If it feeds fewer than 40 drippers, connect another nearby pipe after the meter. Important: dripper lines must end in a plug and must not be joined to another secondary pipe.
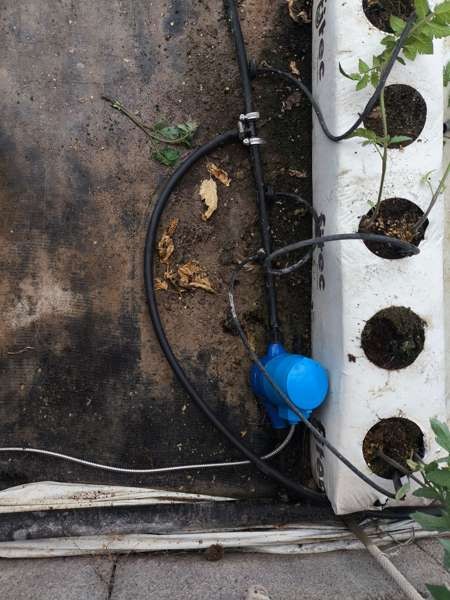
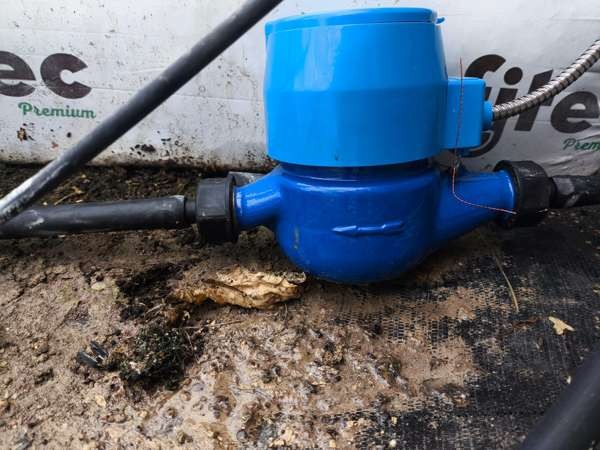
Meter with the arrow showing the direction of flow
Branch to a nearby pipe when there are fewer than 40 drippers
Connection elbow on the auxiliary hose

Step 8 · Installing the power supply box #

Install the 12 V power supply box near the datalogger, power it from 220 VAC and connect it to the datalogger.
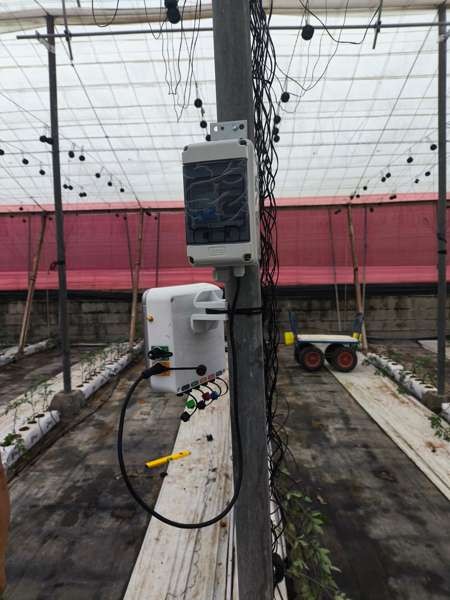
12 V power supply box installed next to the datalogger

Step 9 · Installing and commissioning the datalogger #

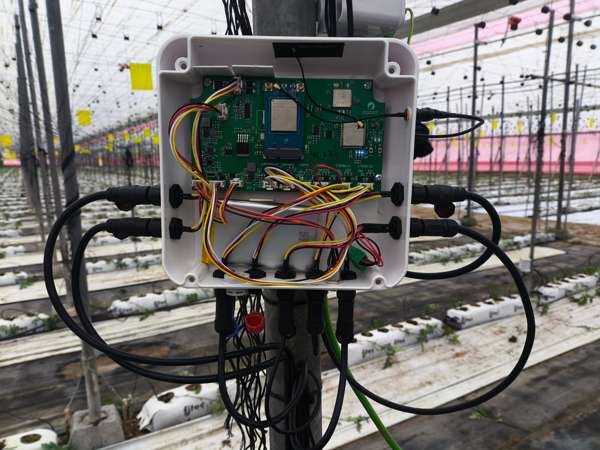
Fit the datalogger box bracket to the post using a metal clamp or plastic cable ties, and mount the box where the other sensors connect. Connect the antenna and the battery to the electronic board. Once the sensors are installed, calibrate the weight and register the unit. Finish by closing the box.
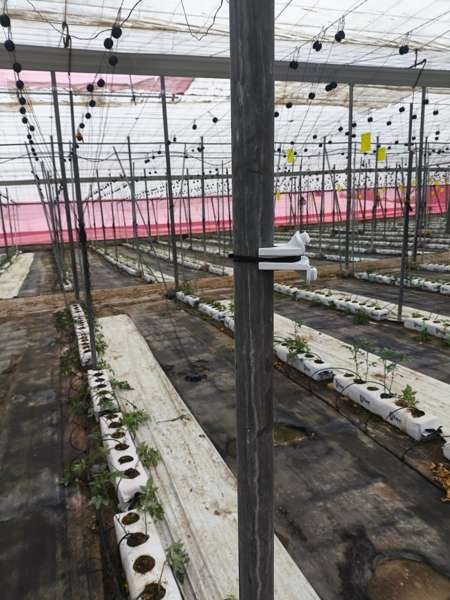
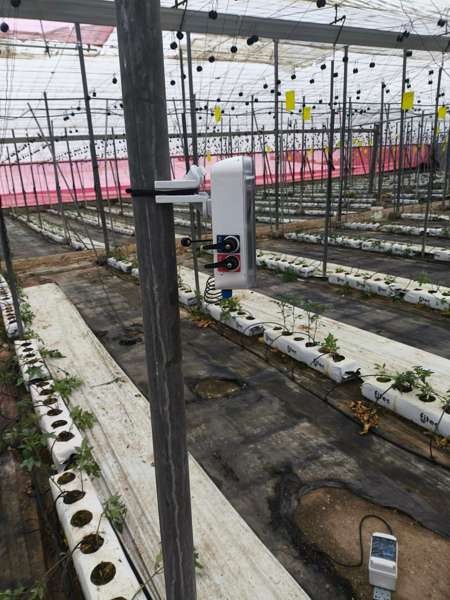
Box bracket fixed to the post with cable ties
Datalogger box mounted on the bracket
Inside the box with the sensors connected and the board active

5. Important notes #

  • Weight calibration: always carried out with an Ikos technician, who sends the calibration codes; the customer helps by placing the weight when the technician says so. The weight supplied is a 200 gram unit.
  • Drainage calculation: once installation is complete, enter the number of drippers on the tray and the number of drippers fed by the line meter. The system uses that data to calculate drainage for each irrigation.
  • Levelling the tank: once in place, add a little water to check that it is properly levelled and does not pool at the sides. Nothing must be in contact with the tank or the load cell, since any extra weight would simulate water that is not there.
  • Leaks: the drip line must be free of leaks, both in the pipe and in the drippers, as this would affect the drainage calculation.
  • Extension cables: the volumetric meter includes a 25 metre extension cable. The radiation sensor, the weight and the valve each include a further 2.5 metre cable to connect to the datalogger.

6. Technical specifications #

Ikos Controller #

Power supply Li-Po, 3.7 V, 4400 mAh
Solar panel 3.6 W · 6.6 V
Microprocessor ARM Cortex-M0+ 32 bit
Communications DUAL: Ultra Narrow Band (UNB) or GPRS
Output signal 3 analogue inputs · 1 RS485 input · 1 I2C
Number of sensor inputs 5
Connectors 4 × M12, 4 pins
Dimensions 161 × 161 × 80 mm
Weight 600 g
Colour Grey
Additional button ON-OFF · LED push-button switch
Protection rating IP 65
Accessory Mounting anchor

Ikos Tensiometer #

Measurement range 0 – 1000 mbar
Power supply 5 V
Length per tensiometer 30 cm
Accuracy 0.5 %
Overload pressure 150 % FS
Temperature compensation range -10 °C ~ 70 °C
Operating temperature range -30 °C ~ +70 °C
Zero temperature coefficient 0.3 % FS / 10 °C

Ikos Multisensor #

Humidity range 0 – 100 %
Temperature range -30 °C ~ +70 °C
Conductivity range 0 – 20 mS/cm
Output signal RS485
Response time < 1 s
Power supply 5 V
Effective measurement area Ø 70 mm · height 70 mm
Encapsulation ABS
Operating temperature range -40 °C ~ +80 °C
Protection IP68
Storage 10 – 60 °C @ 20 % ~ 90 % RH

Ikos DPV pendant (H&T) #

Voltage 5 V
Output signal I2C
Operating range Temperature: -40 °C ~ +85 °C · Humidity: 0 – 100 % · Pressure: 300 – 1100 hPa
Resolution DPV: 0 – 10 kPa · Temperature: 0.01 °C · Humidity: 0.008 %
Accuracy Temperature: ±1 °C · Humidity: ±3 % · Pressure: ±1 Pa

Ikos PAR radiation sensor #

Spectral range 400 – 700 nm
Resolution ± 5 %
Output signal RS485
Measurement range 0 – 2500 µmol/m²·s · 0 – 2000 W/m²
Operating range Temperature: -40 °C ~ 80 °C · Humidity: 0 – 100 %

Ikos volumetric meter #

Power supply 5 V
Output signal RS485
Maximum distance 1000 m
Protection IP68
Operating range Cold water: 0.1 °C ~ 30 °C · Hot water: 0.1 °C ~ 90 °C

Ikos drainage gauge #

Water tank Fibre, green
Structure Metal

Ikos solenoid valve #

Model CWX-15
Voltage 12 V
Operating current Max. 100 mA
Opening / closing time < 5 s
Control mode Contact
Pressure Max. 1.0 MPa
Power < 3 W
Temperature range 0 – 100 °C
Valve size DN20
Protection IP65
Product life 100,000 cycles

Any questions? We are here to help! #

  • 👉 OPEN A TICKET in the app · How? See here
  • 👉 Switchboard: +34 950 50 51 50 (Mon-Fri, 8:00 to 16:00)
  • 👉 Support email: [email protected]
  • 👉 Customer service: +34 651 674 870 (Mon-Fri, 8:00 to 16:00)
  • 👉 Support via WhatsApp: wa.link/boec9r (Mon-Fri, 8:00 to 16:00)
  • 👉 Help Center: help.ikosadvanced.com

Related articles #

  • Hidropónico
  • Montaje, partes y canales del Ikos Controller
  • Cómo diagnosticar las conexiones del Ikos Controller
  • Cómo configurar el contador volumétrico
  • Ikos Multisensor
  • Sensor de radiación solar PAR
¿Te resultó útil?
Cómo instalar el sistema hidropónico Ikos Controller CosmosComment installer le système hydroponique Ikos Controller Cosmos
Accesos directos
  • 1. Equipment description
    • System components
    • Key features
  • 2. Datalogger connectivity schematic
  • 3. Before you start · key recommendations
  • 4. Installation procedure
    • Step 1 · Choosing the installation point
    • Step 2 · Positioning the tray
    • Step 3 · Levelling the tray
    • Step 4 · Installing the bags with their drippers
    • Step 5 · Installing the weight bracket and tank
    • Step 6 · Installing the sensors
    • Step 7 · Installing the meter
    • Step 8 · Installing the power supply box
    • Step 9 · Installing and commissioning the datalogger
  • 5. Important notes
  • 6. Technical specifications
    • Ikos Controller
    • Ikos Tensiometer
    • Ikos Multisensor
    • Ikos DPV pendant (H&T)
    • Ikos PAR radiation sensor
    • Ikos volumetric meter
    • Ikos drainage gauge
    • Ikos solenoid valve
  • Any questions? We are here to help!
  • Related articles
Aprende a utilizar Ikos. Te guiamos paso a paso por la herramienta.
Quiero ser cliente

Si estás interesado en nuestros servicios y te gustaría que te contactemos, déjanos tus datos. Estamos aquí para ayudarte a transformar la gestión agrícola.

Contáctanos
Contacto

Si necesitas solicitar más información, estamos a tu disposición.

[email protected]

+34 950 50 51 50 (L-V 8:00 a 16:00)

Estamos en la calle El Marquesado 20 en Adra (04770), Almería

Soporte

¿Tienes dudas? ¡Estamos para ayudarte!

📲 Abre un ticket desde el menú de soporte en la app — cómo hacerlo

📞 Centralita: +34 950 50 51 50 (L-V 8:00 a 16:00)

📞 Atención al cliente: +34 651 674 870 (L-V 8:00 a 16:00)

💬 WhatsApp: wa.link/boec9r (L-V 8:00 a 16:00)

📩 Email: [email protected]

Copyright © 2024 IKOS ADVANCED S.L. Todos los derechos reservados. Visite nuestra política de privacidad aquí

Help Center
Gestionar consentimiento
Para ofrecer las mejores experiencias, utilizamos tecnologías como las cookies para almacenar y/o acceder a la información del dispositivo. El consentimiento de estas tecnologías nos permitirá procesar datos como el comportamiento de navegación o las identificaciones únicas en este sitio. No consentir o retirar el consentimiento, puede afectar negativamente a ciertas características y funciones.
Funcional Siempre activo
El almacenamiento o acceso técnico es estrictamente necesario para el propósito legítimo de permitir el uso de un servicio específico explícitamente solicitado por el abonado o usuario, o con el único propósito de llevar a cabo la transmisión de una comunicación a través de una red de comunicaciones electrónicas.
Preferencias
El almacenamiento o acceso técnico es necesario para la finalidad legítima de almacenar preferencias no solicitadas por el abonado o usuario.
Estadísticas
El almacenamiento o acceso técnico que es utilizado exclusivamente con fines estadísticos. El almacenamiento o acceso técnico que se utiliza exclusivamente con fines estadísticos anónimos. Sin un requerimiento, el cumplimiento voluntario por parte de tu proveedor de servicios de Internet, o los registros adicionales de un tercero, la información almacenada o recuperada sólo para este propósito no se puede utilizar para identificarte.
Marketing
El almacenamiento o acceso técnico es necesario para crear perfiles de usuario para enviar publicidad, o para rastrear al usuario en una web o en varias web con fines de marketing similares.
  • Administrar opciones
  • Gestionar los servicios
  • Gestionar {vendor_count} proveedores
  • Leer más sobre estos propósitos
Ver preferencias
  • {title}
  • {title}
  • {title}